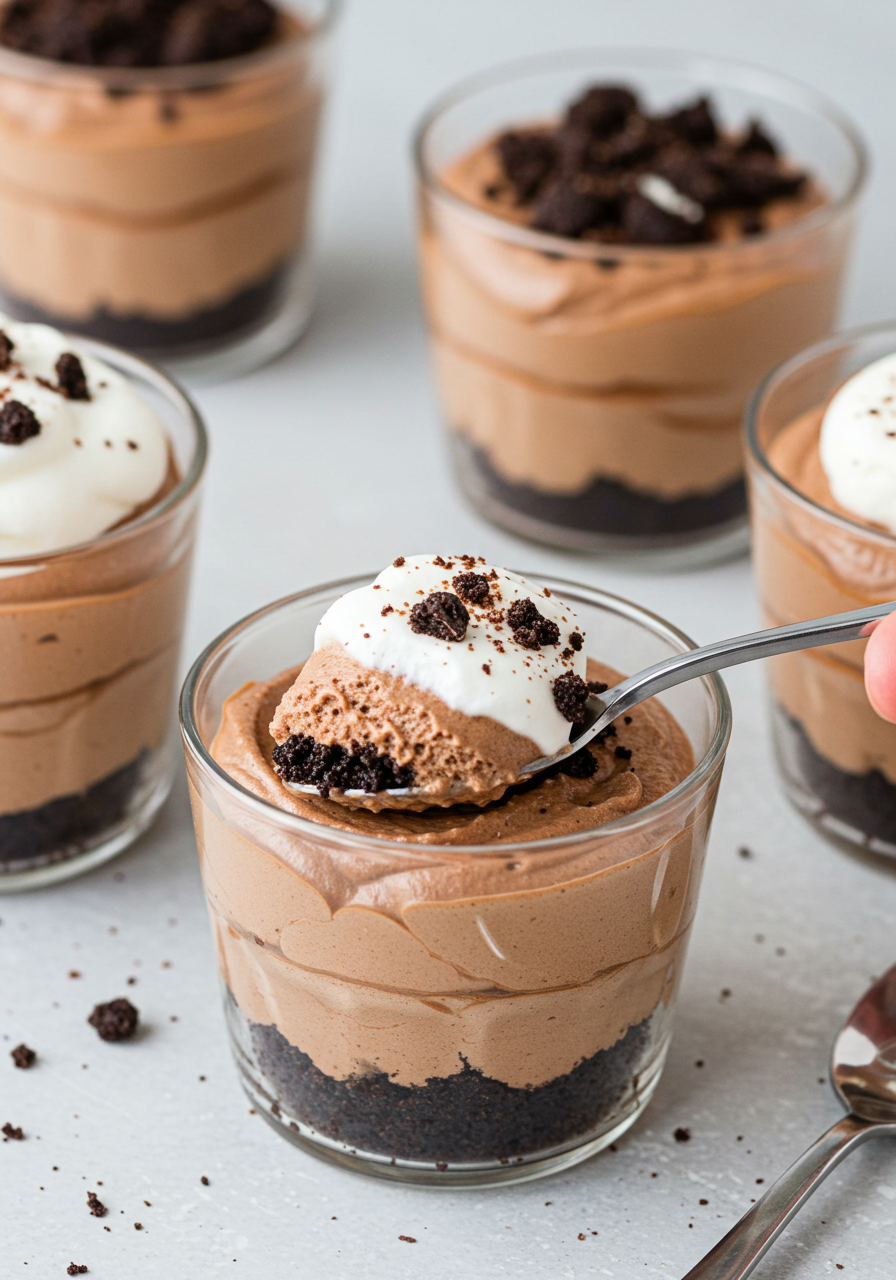
If you’re a fan of rich coffee flavors and creamy desserts, these No-Bake Mocha Cheesecake Cups will be your new favorite treat! With layers of velvety mocha cheesecake filling, chocolate cookie crumbs, and a touch of whipped cream, these cups are indulgent, easy to make, and perfect for any occasion. And the best part? No oven required!
Whether you’re hosting guests, meal-prepping desserts, or treating yourself, these single-serve cheesecake cups deliver big flavor in a fun and fuss-free format.
Want recipes like this delivered straight to your inbox? Subscribe now to get the latest culinary creations you’ll love.
Why You’ll Love This Recipe
No Baking Required – Just mix, layer, and chill—super simple!
Coffee + Chocolate – A match made in dessert heaven.
Perfect Portions – Individual cups make for easy serving and storage.
Great for Make-Ahead – Keep them in the fridge until you’re ready to serve.
Gorgeous Presentation – Elegant enough for dinner parties, easy enough for weeknights.
Ingredients You’ll Need
For the Chocolate Cookie Crust:
- 1 cup chocolate cookie crumbs (like Oreos or chocolate graham crackers)
- 3 tbsp melted butter
For the Mocha Cheesecake Filling:
- 8 oz cream cheese, softened
- ½ cup powdered sugar
- 1 tbsp cocoa powder
- 1 tbsp instant coffee granules (or espresso powder)
- 1 tsp vanilla extract
- ½ cup heavy whipping cream (cold)
For Topping:
- Whipped cream (homemade or store-bought)
- Shaved chocolate or mini chocolate chips (optional)
- Dusting of cocoa or instant coffee (optional)
Tools You’ll Need
- Mixing bowls
- Electric mixer or whisk
- Rubber spatula
- Measuring cups and spoons
- 4–6 small dessert cups or jars
- Piping bag or spoon (for neat layering)
Step-by-Step Instructions
Step 1: Make the Cookie Crust
In a small bowl, mix the chocolate cookie crumbs and melted butter until the texture resembles wet sand.
Spoon about 1–2 tablespoons into the bottom of each dessert cup.
Gently press down with the back of a spoon to create a base layer. Set aside.
Step 2: Prepare the Mocha Cheesecake Filling
In a large bowl, beat the softened cream cheese until smooth and creamy.
Add powdered sugar, cocoa powder, instant coffee, and vanilla extract. Mix until fully combined.
In a separate bowl, whip the cold heavy cream until stiff peaks form.
Gently fold the whipped cream into the mocha cream cheese mixture until light and fluffy.
Step 3: Assemble the Cups
Spoon or pipe the mocha cheesecake filling over the cookie crust in each cup.
Smooth the tops or create a swirl design with a spoon or piping tip.
Refrigerate the cups for at least 2 hours (or overnight) to set and chill.
Step 4: Add Toppings and Serve
Just before serving, top each cheesecake cup with whipped cream.
Sprinkle with shaved chocolate, mini chips, or a light dusting of cocoa or coffee granules.
Serve chilled and enjoy!
Tips for Perfect No-Bake Mocha Cheesecake Cups
Use Room Temp Cream Cheese – It mixes more smoothly and gives a creamier texture.
Chill Thoroughly – Give the filling time to set so the texture holds up.
Don’t Overmix the Whipped Cream – Gently folding keeps the filling light and fluffy.
Customize the Coffee Level – Add more or less instant coffee based on your preference.
Serve in Clear Cups – Show off the beautiful layers for extra wow factor!
Serving Suggestions
- After-Dinner Dessert – Rich and elegant for any dinner party.
- Coffee Bar Treat – Perfect addition to a brunch or coffee-themed gathering.
- Date Night – Romantic, shareable, and ready ahead of time.
- Holiday Dessert – Add a sprinkle of crushed candy canes or cinnamon for seasonal flair.
How to Store & Make Ahead
Storing:
Cover the cheesecake cups tightly with plastic wrap or lids.
Refrigerate for up to 4 days.
Do not freeze—cream cheese and whipped cream don’t thaw well for this dessert.
Making Ahead:
Make the cups a day before serving to allow them to set fully.
Add whipped cream and toppings just before serving to keep them fresh and fluffy.
Frequently Asked Questions
1. Can I use decaf coffee?
Yes! Use decaf instant coffee or espresso powder for all the flavor without the caffeine.
2. Can I make it without whipped cream?
Yes, but whipped cream adds volume and lightness. You can use whipped topping or omit it for a denser texture.
3. What can I use instead of chocolate cookies?
Try graham crackers, vanilla wafers, or even digestive biscuits for a different base flavor.
4. Can I make this dairy-free?
Use a dairy-free cream cheese and coconut cream in place of heavy cream. Make sure all ingredients are plant-based.
5. Can I make it in one big dish instead of cups?
Absolutely! Press the crust into a small baking dish or pie pan and layer the filling on top. Slice and serve after chilling.
Final Thoughts
These No-Bake Mocha Cheesecake Cups are a chocolate-coffee lover’s dream. With creamy texture, bold mocha flavor, and crunchy cookie crust, every spoonful is indulgent and satisfying. And since they’re made ahead and portioned perfectly, you’ll spend less time prepping and more time enjoying.
Serve them at your next gathering or keep a few stashed in the fridge for a sweet pick-me-up whenever you need one!
Preparation Time: 15 minutes
Chill Time: 2 hours
Cuisine: American
Nutritional Information (Per Cup, serves 6):
Calories: 290 | Protein: 4g | Carbohydrates: 20g | Fat: 22g | Fiber: 1g | Sodium: 160mg
No-Bake Mocha Cheesecake Cups
- Total Time: 2 hours 15 minutes
Description
If you’re a fan of rich coffee flavors and creamy desserts, these No-Bake Mocha Cheesecake Cups will be your new favorite treat! With layers of velvety mocha cheesecake filling, chocolate cookie crumbs, and a touch of whipped cream, these cups are indulgent, easy to make, and perfect for any occasion. And the best part? No oven required!
Whether you’re hosting guests, meal-prepping desserts, or treating yourself, these single-serve cheesecake cups deliver big flavor in a fun and fuss-free format.
Ingredients
For the Chocolate Cookie Crust:
-
1 cup chocolate cookie crumbs (like Oreos or chocolate graham crackers)
-
3 tbsp melted butter
For the Mocha Cheesecake Filling:
-
8 oz cream cheese, softened
-
½ cup powdered sugar
-
1 tbsp cocoa powder
-
1 tbsp instant coffee granules (or espresso powder)
-
1 tsp vanilla extract
-
½ cup heavy whipping cream (cold)
For Topping:
-
Whipped cream (homemade or store-bought)
-
Shaved chocolate or mini chocolate chips (optional)
-
Dusting of cocoa or instant coffee (optional)
Instructions
Step 1: Make the Cookie Crust
In a small bowl, mix the chocolate cookie crumbs and melted butter until the texture resembles wet sand.
Spoon about 1–2 tablespoons into the bottom of each dessert cup.
Gently press down with the back of a spoon to create a base layer. Set aside.
Step 2: Prepare the Mocha Cheesecake Filling
In a large bowl, beat the softened cream cheese until smooth and creamy.
Add powdered sugar, cocoa powder, instant coffee, and vanilla extract. Mix until fully combined.
In a separate bowl, whip the cold heavy cream until stiff peaks form.
Gently fold the whipped cream into the mocha cream cheese mixture until light and fluffy.
Step 3: Assemble the Cups
Spoon or pipe the mocha cheesecake filling over the cookie crust in each cup.
Smooth the tops or create a swirl design with a spoon or piping tip.
Refrigerate the cups for at least 2 hours (or overnight) to set and chill.
Step 4: Add Toppings and Serve
Just before serving, top each cheesecake cup with whipped cream.
Sprinkle with shaved chocolate, mini chips, or a light dusting of cocoa or coffee granules.
Serve chilled and enjoy!
Notes
Use Room Temp Cream Cheese – It mixes more smoothly and gives a creamier texture.
Chill Thoroughly – Give the filling time to set so the texture holds up.
Don’t Overmix the Whipped Cream – Gently folding keeps the filling light and fluffy.
Customize the Coffee Level – Add more or less instant coffee based on your preference.
Serve in Clear Cups – Show off the beautiful layers for extra wow factor!
- Prep Time: 15 minutes
- Cook Time: 2 hours
- Cuisine: American